


Bike gear indexing problems almost always trace back to one of a handful of causes: a stretched or gritty cable, a knocked derailleur hanger or a chain and cassette that have simply worn past their best.
I’m Stu, and across years of wrenching on bikes throughout London and Surrey I’ve found that most clunky shifting can be diagnosed correctly and put right with patience, a screwdriver and a barrel adjuster.
You’re grinding up the last rise before Box Hill, or nudging through traffic along the Embankment, and you go for a shift that just doesn’t happen. The chain hesitates, clatters or drops somewhere between two gears you never asked for.
I see this exact scenario several times a week on driveways and office car parks across South London and Surrey, and the good news is that it’s almost always fixable without a full workshop rebuild.
This piece walks through what gear indexing actually is, why it drifts out of true and how to bring it back, from a quick roadside tweak right through to knowing when it’s time to call in a mobile mechanic at Domex Bikes.
Key Takeaways
- Indexed gear systems rely on precise cable tension, so even small stretch or dirt in the housing throws every shift out of alignment.
- Hesitant, skipping or grinding gears usually point to cable tension, limit screw or hanger problems rather than a fault with the shifter itself.
- A bent derailleur hanger can make perfect cable adjustment impossible until it’s straightened with a proper alignment gauge.
- Worn chains and cassettes cause the same skipping symptoms as bad indexing, so checking wear should always be step one, not step three.
- Electronic groupsets and e-bike motor systems like Bosch Smart System and Shimano Steps rarely need a barrel adjuster; they need firmware checks and diagnostic software instead.
What Is Bike Gear Indexing and Why Does it Matter
Bike gear indexing is the calibration that makes one click of your shifter move the derailleur exactly far enough to land the chain on the next sprocket, no more and no less.
Every modern shifter, mechanical or electronic, is built around this idea.
Pull the lever once and a set length of cable gets drawn through the housing, which drags the derailleur sideways by a fixed distance.
That distance is engineered to match the gap between one sprocket on the cassette and the next, so the chain settles cleanly onto its new gear instead of hovering between two.
Older friction shifters didn’t work this way.
You moved the lever and adjusted by feel, nudging it back and forth until the chain stopped rattling.
Indexed systems removed that guesswork, which is exactly why they’re standard on virtually every bike sold today, from a Surrey commuter hybrid to a full carbon road bike.
But that precision comes at a cost.
Because the whole system depends on the cable pulling a very specific amount, even a small change in cable tension throws it out of sync.
A cable that stretches a millimetre or two, or housing that’s picked up a bit of grit, is enough to turn crisp shifts into hesitant or noisy ones.
This is why sorting out a bike gear setup isn’t really about brute force. It’s about small, deliberate corrections that restore that original calibration.
Get the indexing right and you can adjust bicycle gears to reward you with shifts you don’t even have to think about. Get it wrong and every ride reminds you, gear by gear.
Signs Your Bike Gears Need Indexing
Your bike gears need indexing when shifts hesitate, skip or refuse to settle even though the chain, cassette and cables all look fine on the surface.
These symptoms differ from a simply dirty or worn drivetrain, and reading them correctly saves you from adjusting something that was never broken in the first place.
- Hesitation before a shift: the chain pauses on the old sprocket for a beat before finally climbing across, usually meaning the cable has lost a touch of tension.
- Chain skipping under load: you stand on the pedals and the chain jumps a tooth or two, which can be tension related but often points to worn teeth as well.
- Noisy grinding in one or two gears: a rattle appearing only at a specific point in the cassette, rather than across the whole range, usually means the derailleur sits slightly off true for that sprocket.
- Chain won’t reach the smallest or largest sprocket: this points to the limit screws rather than cable tension, since they physically cap how far the derailleur can travel.
- Delayed or double shifts: the lever clicks once but the chain jumps two gears, or nothing happens until you click again. Both are signs the cable pull and the derailleur’s actual movement have drifted apart.
The pattern that matters most is consistency.
If your bicycle gears are not shifting cleanly across the whole cassette in one direction, that’s almost always cable tension and a simple barrel adjuster job.
If the problem is isolated to one end of the range, the limit screws are the more likely culprit.
And if nothing you try makes any difference no matter which way you turn the adjuster, you’re probably looking at a bent hanger or a genuinely worn chain, both covered in detail further down.
Riders who put big miles on a road bike see this wear pattern often, and it’s worth reading up on road bike repair and drivetrain servicing if the skipping keeps returning.
What Causes Poor Gear Indexing: The Root Causes Explained
Poor gear indexing almost always comes down to one of five mechanical faults, and working through them in order before touching a single adjuster saves you from chasing symptoms instead of causes.
The first and most common cause is cable stretch combined with internal friction.
New cables settle and stretch slightly within the first few rides, and over months the housing collects road grit while the factory lubrication dries out.
This makes the cable pull sluggish rather than crisp, which mimics an indexing fault even though the real problem is friction inside the housing rather than the tension setting itself.
Sticky outer housing deserves its own mention because it’s so often mistaken for something else.
If the inner cable can’t slide freely inside the outer housing, no amount of barrel adjuster turning will fix it, because you’re fighting drag rather than correcting tension.
This shows up constantly through a British winter, when salt and standing water work their way into cable runs left unprotected.
A bent or misaligned derailleur hanger is the third cause, and one of the most frustrating because on the surface it can look exactly like a tension problem.
A bent hanger takes the derailleur out of parallel with the cassette, so shifting feels fine at one end of the block and steadily worse towards the other.
This is often why bike gears skip when shifting only in certain parts of the range.
Fourth, check that the wheel is seated squarely in the dropouts.
A wheel mounted slightly askew, or a quick release not fully closed, shifts the whole cassette out of alignment relative to the derailleur, and no cable adjustment will correct a problem that’s actually about wheel position.
Finally, worn chain and cassette teeth cause skipping that persists no matter how perfectly the indexing is set, because the chain simply won’t seat properly on teeth that have worn into a hooked or shark-fin shape.
And that’s usually the answer when someone asks me why do my bike gears keep slipping even after they’ve spent an afternoon on the barrel adjuster.
Nine times out of 10, when someone tells me their gears won’t index no matter what they try, we find a hanger that’s a few degrees out or a chain that should have been replaced months ago. — Stu Smith, a Cytech-accredited Domex Bikes technician
| Symptom | Likely cause | What to check first |
|---|---|---|
| Sluggish shifts across the whole cassette | Cable stretch or dried lubrication | Cable tension and housing condition |
| Shifting worse at one end of the block | Bent derailleur hanger | Hanger alignment |
| Skipping under pedalling load | Worn chain or cassette teeth | Chain wear checker |
Working through this checklist before you touch a barrel adjuster means you’re fixing the actual fault rather than papering over it.
And it’s the same diagnostic order I run through on every mobile visit.
Cable Tension and the Barrel Adjuster: Fine-Tuning Your Shift
The barrel adjuster is the single most useful tool for correcting hesitant or sluggish shifting, and it’s designed so you never need to touch the cable clamp bolt for small corrections.
It’s the knurled dial where the cable enters the rear derailleur, or sometimes at the shifter itself, and turning it in either direction changes how much tension sits in the cable without loosening anything.
Getting comfortable with cable tension and gear shifting is really the foundation of every other adjustment on the bike.
Before touching it, get the bike propped on a stand or turned upside down onto a stable surface, since you need one hand turning the pedals and the other on the shifter and adjuster while watching the chain.
Shift onto the smallest sprocket at the back and turn the pedals while clicking the shifter up one gear.
If the chain hesitates or won’t climb onto the next sprocket, there isn’t enough tension in the cable.
Turn the barrel adjuster anti-clockwise in small increments, generally a quarter turn at a time, which adds cable tension and speeds up the upshift onto larger sprockets.
If instead the chain overshoots, jumping two gears when you only asked for one, or won’t settle back down onto the smaller sprockets, there’s too much tension.
Turning the adjuster clockwise reduces tension and speeds up the downshift, letting the chain drop back cleanly.
Work through the full cassette range this way, not just one or two gears. Shift right up through every sprocket and then back down again, listening for the tell-tale rattle of a chain sitting slightly off true.
It’s tempting to declare the job done after two or three clean shifts, but a bike that shifts perfectly through the middle of the block and hesitates at either end is only half fixed.
Adjust the barrel a quarter turn at a time and re-test after each one.
Overcorrecting is the most common mistake I see from keen home mechanics, because it’s genuinely satisfying to crank the adjuster a full turn and hope for the best.
Patience wins here every time.
If you’d rather leave this fine-tuning to someone else, our mobile bike tune-up service covers exactly this kind of precision gear adjustment, and as a Shimano Service Partner we carry the correct tools for every current groupset.
Setting the Front Derailleur and Limit Screws
Correctly setting the front derailleur needs the right cage height and rotation before cable tension even enters the conversation, because getting the position wrong guarantees rubbing or dropped chains no matter how well the cable is adjusted.
With the chain on the largest chainring, the outer cage plate should sit only a couple of millimetres above the teeth, close enough to shift crisply but with enough clearance that it never grazes the chainring on rough ground.
The cage also needs to sit parallel to the chainrings when viewed from above, rather than angled in or out, or the chain will rub on one side even when the shift itself is spot on.
Once position is right, the high (H) and low (L) limit screws do the safety work.
The low limit screw stops the derailleur from pushing the chain past the smallest chainring and off the inside, which usually means straight into the frame or against the pedal crank.
It should be set by shifting to the smallest ring and largest rear sprocket, then adjusting until there’s a small, consistent gap between the chain and the inner cage plate rather than contact.
The high limit screw does the opposite job, stopping the derailleur from pushing the chain past the outer edge of the largest chainring and off the front entirely, which on a fast descent is more than just an inconvenience.
Shift to the largest chainring and smallest rear sprocket, then adjust the high screw until the outer cage plate just clears the chain without rubbing.
Mountain bikes deserve a slightly different approach here.
Mud packs into the derailleur cage far more aggressively than on a road bike, and suspension movement changes the chain line as the rear end compresses over bumps, so mountain bike front derailleurs are often set with a touch more clearance than a road setup would use.
When working through MTB gear adjustment on a full-suspension frame, it’s worth checking the derailleur position with the suspension both extended and compressed, because a gap that looks fine with the bike static can close right up under load.
Get all of this right and shifting between chainrings should be near silent, with no rubbing whichever rear sprocket you’re using.
Rear Derailleur Indexing: Step-By-Step Adjustment
Rear derailleur indexing follows a fixed order: limit screws first, then cable tension gear by gear, then the B-tension screw last.
Doing it in any other sequence means chasing a moving target, because each step assumes the one before it is already correct.
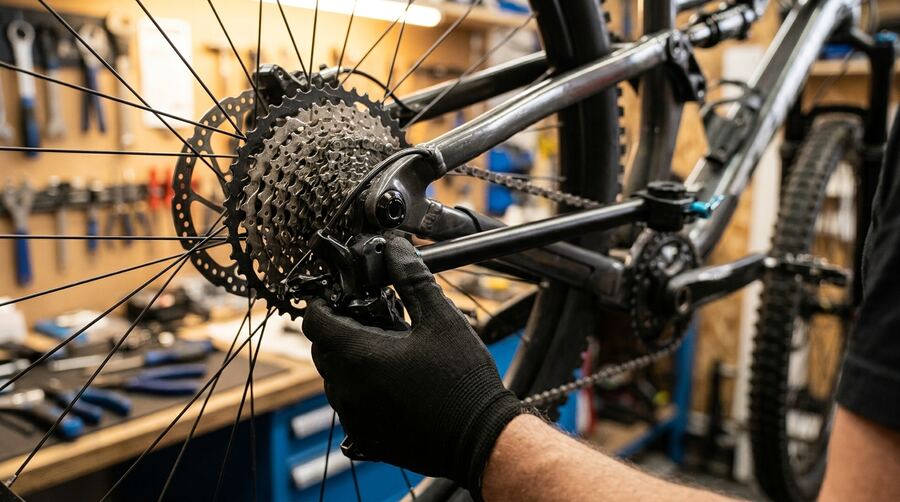
- Shift onto the smallest rear sprocket and set the high limit screw so the top jockey wheel sits directly beneath it, stopping the chain from being pushed off into the frame.
- Shift onto the largest rear sprocket and set the low limit screw so the jockey wheel lines up underneath it without pushing the chain towards the spokes.
- With the limit screws set, reconnect and tension the cable, then shift up one gear at a time from smallest to largest sprocket, using the barrel adjuster to correct any hesitation or overshoot at each step.
- Run through the full range again in both directions, listening for rubbing or delayed shifts at any single point in the cassette.
- Finish with the B-tension screw, which sets the final gap between the top jockey wheel and the sprocket it’s sitting under.
That last step matters more than most home mechanics realise.
The B-tension screw controls how close the jockey wheel sits to the cassette, and on modern cassettes with wide-range gearing, getting this gap right is what separates crisp, quiet shifting from a drivetrain that clatters every time you drop onto the largest sprocket.
Shift to the largest sprocket at the back and check the distance between the top jockey wheel and the cog.
You’re aiming for a gap that’s as close to the sprocket as possible without touching it, typically a few millimetres of clearance, though this varies by derailleur model and cassette size, so check your specific derailleur’s documentation, close enough that shifts stay quick but with enough room that the jockey wheel never touches the sprocket teeth.
Turning the B-tension screw clockwise moves the jockey wheel away from the cassette, while anti-clockwise brings it closer.
Too tight and shifting becomes sluggish and prone to noise. Too loose and shifts feel vague, particularly on cassettes that stretch out to a large sprocket at the low end.
Wide-range mountain bike cassettes make this adjustment far more noticeable than a tighter-range road setup, simply because the derailleur has to swing through a bigger arc to cover the same span of gears.
Derailleur Hanger Alignment: The Hidden Culprit
A bent derailleur hanger can make indexing impossible even when every cable adjustment has been done correctly, because the hanger is what holds the derailleur parallel to the cassette in the first place.
If that parallel relationship is off by even a few degrees, the derailleur’s sideways travel no longer lines up evenly with the sprockets, and no amount of barrel adjuster turning will correct a geometry problem.
Proper derailleur hanger alignment has to come before any cable work.
The hanger sits on the frame’s dropout and is deliberately made from a softer metal than the rest of the frame. That’s by design.
A knock from a crash, from the bike toppling over onto its gear side, or from being squeezed into a car boot or train luggage rack, bends the hanger rather than damaging the frame itself, which is a far cheaper part to replace.
The trouble is that a bend of only a few millimetres is often invisible to the eye, especially from any angle other than directly behind the bike.
This is why a hanger alignment gauge exists. The tool clamps onto the derailleur mounting point and uses a rotating arm with a feeler gauge to measure the hanger’s position at several points around the cassette, comparing each reading against the rim.
It’s the only reliable way to confirm whether a hanger is genuinely bent, and by how much, rather than guessing from a squint down the back of the bike.
You can eyeball a hanger and get lucky, but I’ve seen riders spend an entire afternoon chasing a cable adjustment that was never going to fix a bent hanger. — Stu Smith, a Cytech-accredited Domex Bikes technician explains
Straightening a hanger with the correct tool is a workshop-grade job, not something to attempt with pliers on the roadside.
Push too far in the wrong direction and a hanger that was mildly bent can snap clean off, meaning a wait for a replacement part rather than riding home that day.
Given how inexpensive most hangers are compared with a new derailleur, this is one job worth handing to someone with the gauge rather than risking it yourself.
Chain Wear and Cassette Wear: When Parts, Not Adjustment, Are to Blame
Persistent skipping that survives every indexing adjustment is usually down to chain wear and gear shifting problems rather than a tension fault, and the only way to know for certain is to measure the chain rather than guess.
A chain wear checker drops into the links and reads how far the chain has stretched from its original pitch, expressed as a percentage of elongation — which is why checking bicycle chain wear signs and when to replace it should always come before you touch a barrel adjuster.
Most manufacturers recommend replacing 11- and 12-speed chains once they reach around 0.5% elongation, while older 9- and 10-speed chains can typically run a little longer, to roughly 0.75%, and beyond that point the chain starts dragging the rest of the drivetrain out of shape with it.
The reason this matters beyond the chain itself is that a stretched chain doesn’t sit at the correct pitch on the cassette teeth any more.
It rides slightly high, and under load it can climb or slip across a worn tooth instead of seating properly, producing exactly the same skipping sensation as a badly indexed derailleur.
Fit a fresh chain to a cassette that’s already worn into that mismatched shape and the new chain will often skip too, because the problem has moved from the chain to the teeth it’s meshing with.
This is exactly why replacing chains on schedule protects the more expensive parts of your drivetrain.
A chain is by far the cheapest wearing component on the bike. A cassette costs several times as much, and a rear derailleur more again if skipping is left unchecked long enough to damage the jockey wheels.
Catching wear early with a simple checker tool, and swapping the chain before it drags the cassette down with it, is one of the best value pieces of maintenance any rider can do.
If you’re not sure whether your own drivetrain has crossed that line, our bike chain replacement and repair service includes wear checks as standard, so you’re never guessing whether it’s the chain, the cassette, or both that need attention.
Electronic Gears on e-Bikes: Di2, Bosch and Shimano Steps Diagnostics
Electronic groupsets and e-bike drive systems handle indexing very differently from a cable-actuated bike, because a small motor does the fine positioning instead of a stretched cable.
Shimano Di2 is the clearest example on a standard bike. The electronic control built into the derailleur is designed to handle the fine positioning that used to be set through cable tension automatically, nudging its own position slightly as the rear derailleur moves to avoid chain rub, something a mechanical system can only approximate by feel.
Understanding these bike gear indexing problems on an electronic bike really starts with knowing what the motor is doing on your behalf.
E-bike drive units like the Bosch Smart System and Shimano Steps go a step further again, since the motor, battery, and display all communicate through firmware rather than a mechanical link.
When shifting on one of these bikes starts to feel wrong, the cause is far more likely to be a firmware mismatch, a sensor calibration drift, or a wiring fault than anything a barrel adjuster could touch.
Our certified Bosch e-bike repair service gives us access to dedicated diagnostic tooling for creating and processing service cases, letting faults be read directly from the system rather than guessed at from symptoms alone.
This is where I always tell customers to put the screwdrivers down.
A barrel adjuster has no effect on a torque sensor reading the wrong cadence, and turning one on a system that’s actually reporting a firmware fault can mask a genuine problem rather than fix it.
With a Di2 or Bosch Smart System bike, the diagnosis happens on a laptop before it happens with a screwdriver. Guessing your way through it can hide a fault that turns up somewhere far more expensive later on. — Stu Smith, a Cytech-accredited Domex Bikes technician
For Shimano Steps and Di2 servicing, the same principle applies — software and sensor checks first, spanners second.
| System | How shifting is adjusted | Who should adjust it |
|---|---|---|
| Mechanical cable groupset | Barrel adjuster and limit screws | Confident home mechanics |
| Shimano Di2 | Auto-trim plus software micro-adjustment | Rider for minor trim, technician for faults |
| Bosch Smart System / Shimano Steps e-bike | Firmware, sensor calibration, wiring diagnostics | Certified e-bike technician only |
When to Call a Certified Mobile Mechanic Instead of DIY
A quick barrel adjuster tweak is a fair job for most riders to attempt at home, but hanger straightening, full cable replacement and electronic diagnostics all call for workshop-grade tools and training that go well beyond a multi-tool in a saddle bag.
Knowing which category your problem falls into saves you from either overpaying for a five-minute job or making an expensive mistake trying to save money on a bigger one.
- Suitable for DIY: barrel adjuster tweaks, cleaning and lubricating a dirty drivetrain minor limit screw corrections.
- Better left to a mechanic: hanger alignment with a proper gauge, full inner and outer cable replacement on internally routed frames, and any e-bike firmware or wiring fault.
- Always worth a professional check: persistent skipping that survives every home adjustment, since that pattern usually means worn parts or hidden damage.
For anyone commuting on an e-bike around London or Surrey, there’s a practical reason beyond skill level to book a mechanic rather than DIY-ing a bigger job.
A loaded e-bike with battery and rack fitted is a genuinely heavy machine, and getting that onto a car roof rack or onto a train during rush hour is its own kind of ordeal.
A certified mobile mechanic coming to your home, workplace or the roadside removes that problem entirely, and transparent flat-rate pricing means you know the cost before a spanner is even picked up.
If your gears have gone past what a barrel adjuster can fix, our intensive use servicing covers full cable replacement, derailleur alignment and a complete drivetrain overhaul in one visit, usually the right call once you’re chasing a fault rather than doing routine maintenance.
Preventing Gear Indexing Problems: Maintenance and How Often to Re-index
Keeping gears indexed correctly for longer comes down to routine cleaning and knowing roughly how often cables need replacing, rather than any single trick.
A drivetrain that’s regularly wiped down and re-lubricated resists the dirt and dried grease that cause sluggish cable pull in the first place, which is the single biggest contributor to indexing drift on a bike ridden through a typical British winter.
So how often should you index bike gears? Realistically, whenever shifting starts to feel less crisp than it did last month, plus a proper check-over at the start of each season.
Cables and housing don’t last forever either.
As a rough guide, replacing them every one to two years keeps shifting crisp, and riders who commute through wet, salted roads all winter should lean towards the shorter end of that range, since moisture and grit work their way into housing far faster than on a bike kept for dry summer rides.
It’s also worth checking indexing specifically after any cable replacement or after fitting a new wheel, since both change the exact geometry the derailleur was originally set up around.
- Lubricating the chain and cassette properly every few weeks — more often through winter grit — is the single habit that does most to prevent indexing drift.
- Check cable tension and listen for rubbing at the start of each season.
- Replace gear cables and housing every one to two years, sooner if you ride year round.
- Re-check indexing after fitting any new cable, wheel, or derailleur hanger.
For riders putting serious mileage in, an annual professional service is worth the modest cost simply because a trained eye catches wear before it becomes a bigger repair.
Our regular use servicing package is built around exactly this kind of interval, covering cable replacement and derailleur re-lubrication before problems set in rather than after.
Keep on top of these basics and indexing problems become a rare inconvenience rather than a monthly headache, which is really the whole point of maintaining a bike properly.
A well-indexed drivetrain doesn’t just shift better, it lasts longer and costs less to keep running over the years you own it.
Frequently Asked Questions
There’s no fixed mileage rule, but checking indexing at the start of each season, after fitting a new cable or wheel, and any time shifting feels off is a sensible routine for most riders.
Not entirely, but the tool list is short. A barrel adjuster turns by hand on most derailleurs, though checking limit screws needs a small screwdriver and hanger alignment needs a dedicated gauge.
Pedalling under load puts far more strain through the chain than spinning the cranks by hand, so a marginal adjustment or a slightly worn chain can hide on a stand and only show itself once you’re pushing power through the pedals outdoors.
Best avoided. A bent hanger can eventually let the derailleur drift into the spokes or the cassette, risking damage to the wheel and derailleur together, so it’s worth having it checked with an alignment gauge as soon as you suspect it.