


A worn bicycle chain rarely announces itself with a bang.
It shows up as vague shifting, a faint skip under load or a gritty feel through the pedals, and the fix is cheap only if you catch it before the cassette and chainrings start wearing to match the stretched chain.
I’m Stu, and I’ve spent enough years wrenching on bikes for Domex Bikes to know that chain wear is the single most avoidable expense in cycling.
Riders come to me convinced their gears are broken, their derailleur is faulty, or their e-bike motor is playing up.
Nine times out of 10 it’s a tired old chain quietly wrecking the rest of the drivetrain.
This guide walks through the signs, the science and the exact thresholds I use out on the road, so you can catch the problem while it still only costs you a chain.
Key Takeaways
- A worn chain rarely fails suddenly. It shows up first as skipping under load, hesitant shifts, and drivetrain noise before any real damage is visible.
- Chains don’t literally stretch. Microscopic wear at the pins and bushings increases the link pitch, which is why the term “chain stretch” is misleading.
- Modern 11 to 13-speed chains need replacing earlier (around 0.5% wear) than older six to 10-speed chains (around 0.75%) because narrow drivetrains have less tolerance for mismatch.
- Leaving a chain unchecked past roughly 1% wear almost always drags the cassette, and sometimes the chainrings, into the repair bill.
- UK winters, stop-start commuting and e-bike motor torque all accelerate chain wear, so riders in these conditions should check more often than the general guidelines suggest.
Why Bicycle Chain Wear Signs Matter for Every Rider
Bicycle chain wear signs matter because the gap between noticing them and ignoring them is the gap between a small bill and a large one.
A chain itself is a modest, consumable part, but left unchecked it reshapes the teeth on your cassette and chainrings until those far pricier components need replacing too.
I’ve lost count of the number of times a customer has called about “gears that won’t stop skipping”, only for us to find a chain that’s been quietly grinding away at the cassette for months.
This matters even more for e-bike commuters.
The motor’s assistance means torque is applied to the drivetrain almost constantly, and a worn chain skipping under that kind of power can feel genuinely alarming rather than just annoying.
Add in the fact that many riders don’t trust unfamiliar garages with an expensive e-bike, and it’s easy to see why chain wear becomes a source of real anxiety rather than a routine maintenance task.
The good news is that this is one of the easiest problems in cycling to get ahead of.
Once you understand what’s actually happening inside the chain, how to spot the early warning signs and where the wear thresholds sit, you move from anxious guesswork to confident, informed maintenance.
How a Bike Chain Works and Why it Wears (Not Stretches)
A bike chain is built from alternating inner and outer plates, held together by pins that pass through bushings, with rollers sitting around those bushings to engage the teeth of your chainrings and cassette.
Every time you pedal, these tiny components rotate and rub against one another under real load, and it’s that friction, not the metal plates themselves, that causes the wear everyone calls
chain stretch”.If you’ve ever wondered why does a bike chain stretch over time, this is your answer.
MYTH BUSTING: I want to clear up a persistent myth here, because I hear it constantly on the roadside: the metal in a chain does not physically elongate.
What actually happens is that the pin and bushing interface wears down at a microscopic level with every rotation, and that tiny bit of extra clearance lets the plates sit fractionally further apart.
Multiply that across all 116 or so links in a typical chain, and the whole thing measures noticeably longer than it did when new, even though not one individual piece of metal has actually grown.
Some riders still believe that removing a link “resets” a worn chain. It doesn’t.
Taking out a link only shortens the chain. It does nothing to reverse the wear already present in the remaining pins and bushings, and running a shortened, worn chain simply continues the same damage to your cassette teeth.
The only real fix for a worn chain is a fresh one.
Here’s where modern drivetrains complicate things.
Older 6- to 10-speed chains are comparatively wide and forgiving, with enough clearance built in that a bit of pitch growth doesn’t immediately upset shifting.
Narrower 11, 12 and 13-speed chains run on much tighter tolerances to fit the extra sprockets onto the same cassette body.
That means even a small amount of wear-related pitch change starts affecting shift quality far sooner than it would on a wider, older-style chain, which is exactly why these systems demand earlier replacement.
The narrower the chain, the more useful a chain wear indicator becomes for spotting trouble early.
Signs of a Worn Bike Chain You Can See, Hear and Feel
The signs of a worn bike chain usually turn up during ordinary riding, long before you’d think to check it with a tool.
If you know what to listen and feel for, your commute or weekend ride becomes a rolling diagnostic session.
- Skipping under load: the chain slips or jumps on the cassette when you stand up on the pedals or push hard up a hill, a classic sign of chain wear and gear skipping working together.
- Hesitant or vague shifting: gear changes feel slower, rougher or less precise than they used to, even though the derailleur hasn’t been touched.
- Excessive drivetrain noise: beyond the usual dry squeak, listen for grinding, clicking under load or a constant low rumble from the cassette area.
- Stiff or rusty links: a chain that doesn’t flex smoothly through the derailleur pulleys, or that shows visible surface corrosion, is usually already wearing internally too.
- Chain lifting or slipping off the chainring: a stretched chain sits higher on the teeth and can start to lift away or derail more often than it should.
- Shark-tooth cassette profiles: look side-on at the cogs. Teeth that have started to hook or point like fins tell you the chain has already been worn for some time.
How do you know if your bike chain is worn without pulling out a tool at all? Try the daylight test.
Shift onto the largest chainring, pull the chain forward away from the teeth at roughly the three o’clock position, and see how far it lifts.
A healthy chain barely moves. One that lifts enough to show a clear gap of daylight is telling you it’s had enough.
I’ve had riders swear their derailleur was faulty three times in a row, and every time it was a chain we should have swapped months earlier. — Stu Smith, Domex Bikes, certified technician
Mountain bikers see a slightly different wear pattern to road or commuter riders.
Mud and grit work their way into the rollers and bushings far more aggressively than road grime does, so off-road chains often show stiffness and rough running before they show the classic skip.
On e-bikes, the motor’s torque makes any existing skip feel far more sudden and pronounced than it would on an unassisted bike, because the power delivery doesn’t ease off the way your legs naturally do.
That combination of extra force and reduced warning time is exactly why I tell e-bike owners not to wait for symptoms before checking their chain.
If rust has already taken hold, it’s worth reading our guide on cleaning a rusty bike chain before you assume the worst, since surface corrosion doesn’t always mean the chain is beyond saving.
How a Worn Chain Damages Your Cassette and Chainrings
A worn chain damages your cassette and chainrings by changing exactly where and how it contacts each tooth.
A new chain sits deep in the valley of every cog, spreading load evenly across the whole tooth profile.
As the pitch grows through wear, the chain starts riding higher up the tooth face instead, concentrating force on a much smaller contact area.
These effects of a worn chain on drivetrain parts are what turn a cheap job into an expensive one.
That concentrated force is what grinds cassette teeth into the hooked, shark-tooth shape I mentioned earlier.
Once a sprocket has worn into that shape, it has effectively been reshaped to match the worn chain that caused it.
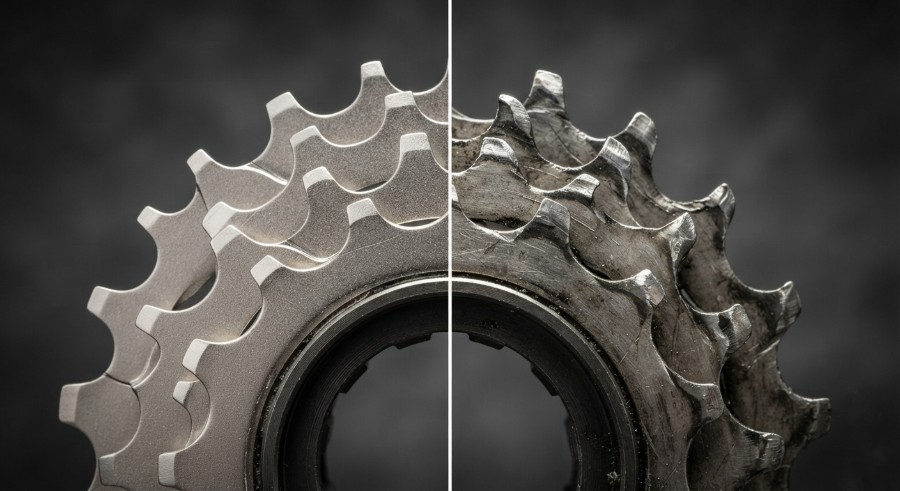
Fit a brand new chain onto that same cassette and the correctly-spaced links no longer match the reshaped teeth.
The result is skipping under power, sometimes worse than what you had before, simply because the components no longer agree with each other.
That’s sprocket wear from chain stretch in a nutshell.
Chainrings suffer the same fate, just slightly more slowly, because the front teeth generally see less repetitive load concentration than the rear cassette does.
But leave a worn chain in place long enough and the chainring teeth start showing the same pointed, hooked wear pattern.
This is the trade-off I try to get across to every customer.
A chain on its own is genuinely inexpensive. But once that chain has been left too long, though, you’re not just buying a chain, you’re buying a cassette and quite possibly chainrings as well, easily running into the £150 to £300-plus range on a mid-to-high-end drivetrain.
It’s the single most common preventable drivetrain repair we see at Domex Bikes, and almost every case traces back to the same root cause: nobody checked the chain until it was already skipping.
The frustrating part is how avoidable this is.
A chain replaced at the right moment protects the cassette and chainrings for years of further use.
A chain replaced too late guarantees you’ll be paying for parts that had plenty of life left in them, purely because they were forced to wear alongside a stretched chain.
How to Measure Chain Wear: Chain Checker and Ruler Methods
The most accurate way to measure chain wear at home is with a dedicated chain checker tool, a small gauge that drops into the chain and tells you, in seconds, whether it has passed a given wear threshold.
Most gauges work on a simple go or no-go basis, with one end calibrated to around 0.5% wear and the other to around 0.75% or 1%.
To use one properly, shift the chain so it’s running fairly straight under light tension, place the tool across the rollers on the lower or top run of chain, and let it settle under its own weight rather than pressing down on it.
If the shorter end drops fully into the chain, you’ve hit that wear percentage. If the longer end also drops in, replacement is overdue rather than optional.
A chain checker takes 10 seconds and costs less than a round of coffees. I’ve never met anyone who regretted buying one. — Stu Smith, Domex Bikes, certified technician
If you don’t own a chain checker, the ruler method still works, though it takes a bit more care.
A new chain measures exactly 12 inches across 12 complete links, pin centre to pin centre.
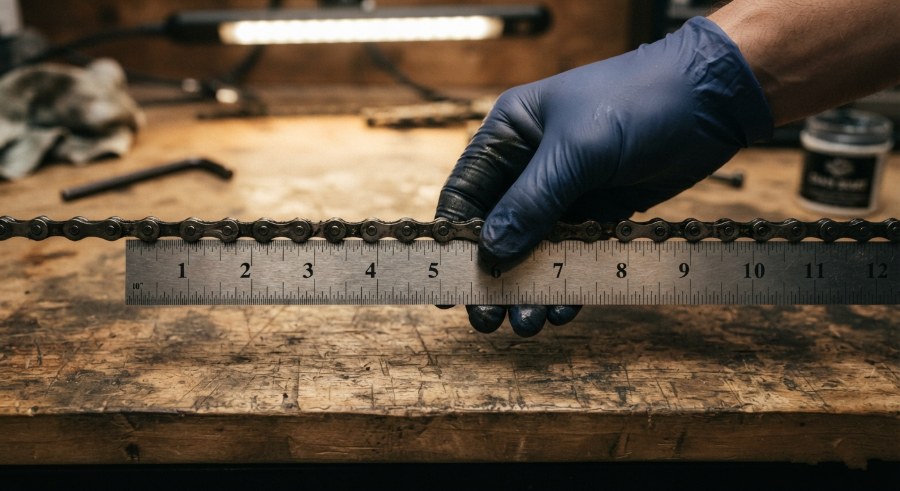
Line up a rivet with the zero mark on your ruler, count 24 more rivets, and the final rivet should land right on the 12 inch mark. If it’s off by more than a sixteenth of an inch, the chain has stretched to the point of replacement.
Here are some more useful tips:
- Measure more than once: wear isn’t even along the length of a chain, so check at least two or three different sections before deciding.
- Exclude the quick-link: quick-links wear more slowly than standard links and will skew a reading if included.
- Clean before measuring: a thick layer of old lube or grit can make a chain read as less worn than it actually is.
Where this gets trickier is on narrow 11, 12 and 13-speed chains.
Some budget gauges weren’t designed with these tighter tolerances in mind, and results can vary depending on hand pressure, chain tension, and even which particular tool you’re using.
That inconsistency on modern narrow chains is exactly why, later in this guide, I’ll cover when it makes more sense to let a certified mechanic confirm the reading rather than relying on a single home measurement.
Chain Wear Thresholds: When to Change a Bike Chain
Knowing when to change a bike chain comes down to a fairly precise percentage, and that percentage depends on how many speeds your drivetrain runs.
Get this timing right and you protect the far more expensive parts around the chain. Get it wrong and you’ll likely be paying for those parts anyway.
For 11 to 13-speed drivetrains, but not hub-gear systems, which tolerate more wear, the widely used threshold sits at around 0.5% wear.
Cassettes on these narrower, tighter-tolerance drivetrains should be replaced alongside the chain once wear has reached roughly 0.75%.
For older 6- to 10-speed setups, which have more built-in tolerance, you generally have a bit more breathing room before the same consequences kick in, with replacement commonly recommended around 0.75% wear.
| Drivetrain type | Replace chain at | What happens if you wait |
|---|---|---|
| 11 to 13-speed and hub gear | Around 0.5% wear | Cassette teeth begin reshaping quickly once wear passes 0.5 to 0.75% |
| 6 to 10-speed | Around 0.75% wear | More tolerant, but cassette damage becomes likely beyond 0.75 to 1% |
| Any drivetrain, beyond 1% | Already overdue | Cassette, and often chainrings, are almost certainly already damaged |
Beyond roughly 1% wear on any drivetrain, I’d treat the cassette as compromised until proven otherwise.
At that point the teeth have typically reshaped themselves to match the elongated chain, and fitting a fresh chain on its own tends to produce exactly the skipping under load you were trying to avoid.
It’s also worth knowing that manufacturers don’t all agree down to the decimal point.
SRAM specifies a slightly higher replacement threshold of around 0.8% for its own chains, while other major groupset makers recommend 0.5% across their 11- and 12-speed ranges, so if you know your groupset brand, their own guidance is worth following alongside the general rule.
The reason narrower modern chains demand earlier replacement isn’t really about the chain itself wearing faster in absolute terms.
It’s that the smaller clearances built into 11-, 12- and 13-speed cassettes leave far less room for pitch growth before shifting and tooth engagement start to suffer, so the same amount of wear simply causes visible problems sooner than it would on an older, wider system.
What Accelerates Chain Wear: London Commutes, Weather and e-Bike Torque
Certain riding conditions wear chains far faster than others, and if you’re commuting through South London or Surrey, you’re probably dealing with several of them at once.
Wet weather, road salt and grit don’t just sit on the outside of a chain. They work their way into the pin and bushing interface and turn into a genuinely abrasive paste with every rotation.
UK winters are particularly hard on chains. Rain washes away lubricant, salted roads accelerate corrosion and the constant wet-dry cycle keeps grinding contaminants moving through the chain’s internals.
Riders who cycle through a typical British winter without adjusting their cleaning routine will usually see faster wear than the same rider covering identical mileage in a dry summer.
Stop-start urban commuting adds its own stress on top of the weather. Every set of traffic lights means another hard acceleration, and repeated high-torque efforts from a standing start put more load through the pin and bushing interface than steady, spun-out pedalling ever does.
Cross-chaining, running the big chainring with the largest cassette cogs or the small chainring with the smallest cogs, adds extra strain because the chain is forced to run at an angle rather than sitting straight.
It’s a habit I see constantly in riders squeezing through London traffic without thinking about gear selection.
E-bikes bring their own set of pressures. Motor torque applies continuous, powerful force through the drivetrain, and that constant load accelerates the same pin and bushing wear that hard human accelerations cause, just more often and more consistently.
I generally recommend e-bike owners get into the habit of checking their chain roughly every 400 miles rather than waiting for a scheduled service — our e-bike servicing and repairs include a chain wear check as standard, simply because the wear curve moves faster than it does on an unassisted bike.
Leisure riding and lighter mountain biking sit at the other end of the spectrum. Steady-paced weekend rides on cleaner surfaces put comparatively little stress through the chain.
Off-road riders trade that lighter load for a different problem entirely, since mud and grit ingress creates distinct mountain bike chain wear patterns even at modest mileage.
Preventing Chain Wear: Cleaning, Lubrication and Riding Habits
Preventing chain wear mostly comes down to two habits done consistently: keeping the chain clean, and keeping it properly lubricated.
Grit and old lubricant together form an abrasive grinding paste inside the rollers, and that paste does more damage per mile than almost anything else you could do to a chain.
Watching out for the usual bicycle chain wear signs alongside these habits is what turns maintenance from a chore into a proper preventative routine.
- Clean before you lube: never apply fresh lubricant onto a dirty chain, since it simply drives grit deeper into the rollers instead of protecting them.
- Wipe off the excess: a properly lubricated chain has oil on the inside of the rollers and almost none visible on the outside plates.
- Avoid cross-chaining: keep the chain running as straight as possible between chainring and cassette.
- Ease off hard accelerations: where traffic allows, smoother power delivery puts less strain through the pins.
Our own guide to lubricating a bike chain properly goes into the step-by-step detail, and it’s worth 10 minutes of anyone’s time who wants to genuinely extend chain life rather than just top up oil occasionally.
One technique worth mentioning, even though it won’t suit most commuters, is chain rotation.
Some serious cyclists and fleet operators run two or three chains in rotation, swapping them regularly so no single chain accumulates wear as quickly, which in turn slows how fast the cassette wears, too.
It’s a genuinely effective approach for very high-mileage riders or organisations managing multiple bikes, but for the average person riding to work and back, it adds complexity without much practical benefit over simply checking and replacing a single chain on schedule.
None of this needs to be complicated.
A quick wipe-down after wet rides, a proper clean and relube on a regular cycle and a bit of awareness around gear selection will do more for your drivetrain’s lifespan than any single product on the shelf.
Bicycle Chain Replacement Cost and What Affects the Price
Your bike chain replacement cost is refreshingly modest when you catch wear early, and considerably less modest when you don’t.
Replacing the chain alone, before it’s damaged anything else, typically involves buying a chain matched to your drivetrain’s speed and having it fitted, which is a straightforward job that shouldn’t take long at all.
Once wear has been left unchecked and the cassette has started showing that shark-tooth profile, the job changes entirely.
Now you’re looking at a chain plus a cassette, and on higher-end drivetrains possibly chainrings, too.
A neglected chain can end up needing a new chain, chainrings, cassette and even jockey wheels together, pushing the bill to somewhere around £100, versus a fraction of that if the chain alone had been swapped in time.
That gap between catching it early and catching it late is the whole argument for regular checking.
Attempting the swap yourself without the right tools or a clear understanding of your drivetrain’s speed carries its own risk.
Modern narrow chains are speed-specific, and fitting the wrong one, or fitting it without a proper chain tool or quick-link pliers, can leave you with poor shifting or a chain that fails under load.
That risk is amplified on e-bikes, where the additional torque through the drivetrain means any weakness in a poorly fitted chain is exposed far more quickly than on a standard bike.
If you’d rather leave the job to someone who does it daily, our bike chain repair and replacement service covers exactly this, fitted correctly the first time with the right chain for your drivetrain.
When to Book a Certified Chain Assessment Instead of Checking it Yourself
For busy London and Surrey commuters, particularly those riding e-bikes, there’s a strong case for having a certified mechanic assess chain wear rather than relying entirely on a home measurement.
Heavy e-bikes aren’t easy to lug down to a shop, home chain checker gauges can give inconsistent readings on narrow modern chains, and a proper professional check catches problems a rushed DIY measurement might miss.
This is where Domex Bikes’ Cytech-accredited mobile diagnostics earn their keep.
Rather than you transporting a heavy bike anywhere, we come to your home, workplace or the roadside across South London, SW London and Surrey, and carry out the assessment on your doorstep.
It’s the same principle behind our approved partnership status for Bosch e-bike servicing, bringing proper diagnostic capability directly to the customer instead of the other way round.
On an e-bike, I’d rather check the chain properly on your doorstep than have you guess with a cheap gauge and get it wrong. — Stu Smith, Domex Bikes, certified technician
A genuine advantage of booking a professional assessment is that it doesn’t stop at the chain.
In the same visit, a certified mechanic checks cassette and chainring condition too, which means you find out immediately whether you’re looking at a simple chain swap or something more involved, rather than fitting a new chain, discovering it skips, and having to book a second appointment.
Our intensive use servicing package is built around exactly this kind of full drivetrain check for high-mileage riders and commuters.
And with transparent flat-rate pricing agreed before we start, there’s none of the anxiety that comes with dropping a bike off somewhere unfamiliar and waiting for a phone call with an unexpected number on it.
Chain wear will always be part of owning a bike, but it doesn’t have to be part of owning an expensive drivetrain repair.
Get into the habit of checking regularly, act on the signs your bike is already giving you and you’ll spend your money on rides instead of cassettes.
If you’re ever unsure what your chain is telling you, get in touch and we’ll take a proper look before it becomes a bigger job than it needed to be.
Frequently Asked Questions
There’s no single mileage that suits everyone, but a good habit is checking every few hundred miles, or roughly every 400 miles on an e-bike given the extra motor torque involved. Riders through wet UK winters or muddy trails should check more often than that.
Yes, and it’s one of the most common and preventable causes of expensive drivetrain repairs. Once a chain elongates past the safe threshold, it reshapes the cassette teeth to match, and a fresh chain on that reshaped cassette will typically skip under load.
Not always. Poor derailleur adjustment, cable tension issues, or a bent derailleur hanger can all cause similar skipping, which is one reason a professional assessment is useful, since it rules other causes in or out rather than assuming the chain is guilty by default.
No, chain wear happens evenly on both sides internally, so flipping a chain over makes no real difference. The chain rotation technique some serious cyclists use involves running multiple separate chains in sequence, not flipping a single one.